
Last Updated: October 28, 2026
Quick Summary
Essential survival items for hikers center on navigation, light, fire, shelter, insulation, first aid, water, and food. Build your kit around these categories and check each item before your hike. A paper map and baseplate compass belong in every kit because they never need charging.
- Carry a paper map and baseplate compass as your first navigation layer.
- Look for a headlamp low mode of 5-20 lumens plus a 200+ lumen high mode.
- Pack waterproof matches, a ferrocerium rod, and dry tinder for fire starting.
- Water purification tablet strips cost $0.99 and treat one liter each.
- The 125-Piece Emergency Survival Gear Kit pouch measures 8.66 x 6.3 x 1.97 inches.
Table of Contents
- 1. Navigation: Map, Compass, and a GPS Backup
- 2. Illumination: Headlamp and Spare Batteries
- 3. Fire-Starting Tools: Ferro Rod, Matches, and Tinder
- 4. Emergency Shelter: Tarp, Bivy, and Thermal Blanket
- 5. Insulation and Weather Protection: Extra Clothing and Rain Gear
- 6. First Aid and Injury Care: Kit, Guide, and Blister Treatment
- 7. Water and Hydration: Carrying Capacity and Purification
- 8. Extra Food, Nutrition, and Signaling Tools
- Frequently Asked Questions
1. Navigation: Map, Compass, and a GPS Backup
Navigation is one of the essential survival items for hikers. A map, compass, and GPS backup can help you plan and check your route. Readers building a survival kit can browse broader gear picks that complement these navigation essentials.
Layer one is a paper map and baseplate compass. Batteries die, screens crack, and cell service vanishes in canyons and dense timber. A map and compass never need charging. Layer two is a GPS device or phone app for speed and confirmation. Layer three is your brain: know your route, your turnaround time, and the direction of the nearest road before you leave the trailhead.
A common mistake is carrying a compass without knowing how to take a bearing. Practice at home until it takes seconds. The National Park Service trip planning guidance is blunt about this: know your route and carry a map and compass you can actually use.
- Paper map of your route, in a waterproof sleeve
- Baseplate compass with declination adjustment
- GPS device or offline maps downloaded to your phone
- Whistle attached to your pack strap
2. Illumination: Headlamp and Spare Batteries
A headlamp keeps both hands free for map work, first aid, or setting up shelter.
What to look for in a hiking headlamp
- Output and runtime: Look for a low mode in the 5-20 lumen range that will run for many hours, plus a high mode (200+ lumens) for route-finding and signaling. A headlamp that only advertises its brightest setting is telling you half the story.
- Beam pattern: A flood beam lights up camp chores and first aid; a spot beam throws light down the trail. Many models offer both, and a red-light mode preserves night vision and is less likely to blind companions in a shared shelter.
- Battery chemistry: Alkaline AAAs are cheap and replaceable at any gas station, but they sag in cold and lose capacity in storage. Lithium AAAs cost more but hold up in freezing temperatures and have a long shelf life. Rechargeable lithium-ion headlamps are lighter and brighter but depend on a charging plan, fine for an overnight with a power bank, risky on a multi-day trip with no resupply.
- Weather sealing: An IPX4 rating handles rain and sweat; IPX7 survives a dunking. If your route crosses streams or you hike in sustained rain, pay for the higher rating.
- Lockout mode: A headlamp that turns on inside your pack drains itself before you need it. A physical lockout or a reversed battery is a cheap insurance policy.
Carry a backup light and spare batteries
Carry a second light, either a small backup headlamp or a handheld, plus a full set of spare batteries in a sealed bag. A rechargeable solar lantern is another lighting option to consider. The backup is not redundancy for its own sake: if your primary light fails at dusk on a wrong turn, the backup is the difference between walking out and spending the night. Store spare batteries in a waterproof container and keep them separate from metal items that can short the terminals.
Maintain and practice with your light
- Before every trip: Click through every mode, confirm the lockout works, and swap in fresh batteries if the light has been sitting for a season.
- At home: Practice changing batteries and switching modes by feel, in the dark. Under stress, with cold hands, fumbling a headlamp you have never operated is a common failure point.
- After the trip: Wipe the lens, dry the strap, and remove batteries from any light you will store for months.
Keep the headlamp on your person, not buried in the pack, so it is available when you need it.
3. Fire-Starting Tools: Ferro Rod, Matches, and Tinder
Fire-starting tools can be part of a hiking kit. Consider carrying waterproof matches, a ferrocerium rod, and dry tinder.
Our multi-functional outdoor first aid kit with trauma bag includes a ferrocerium rod, tinder rope, and a fire blower.
4. Emergency Shelter: Tarp, Bivy, and Thermal Blanket
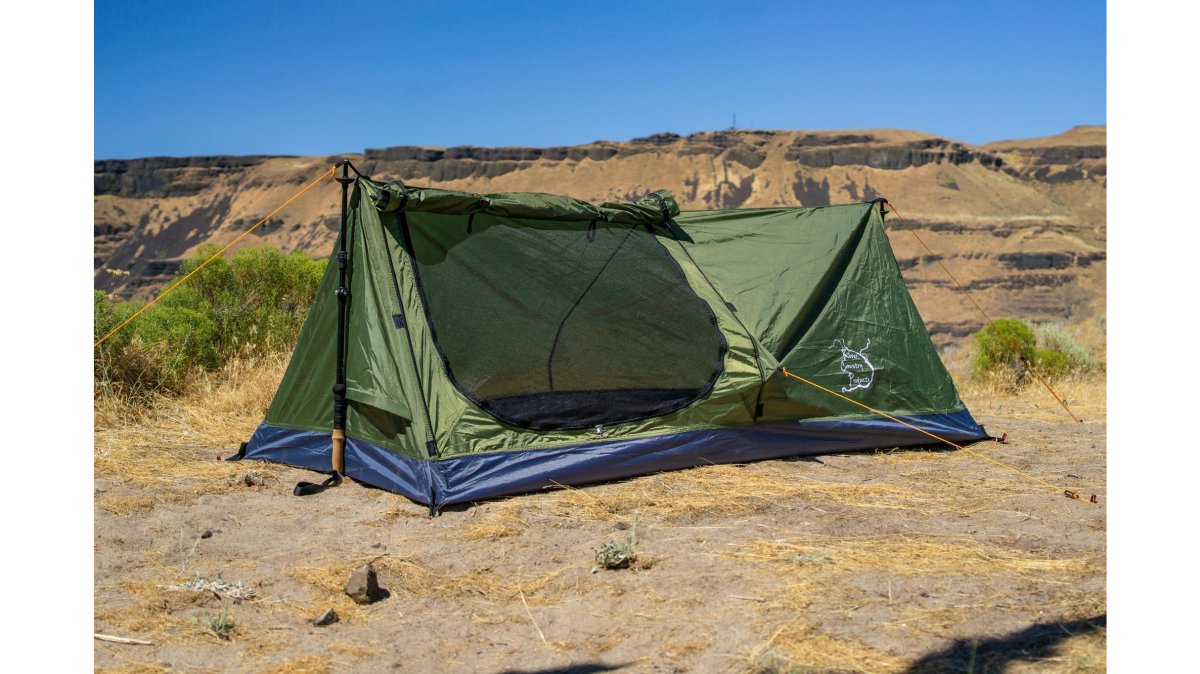
Emergency shelter is one consideration when preparing for a hike. A tarp, emergency bivy, or thermal blanket may be included in a kit.
For solo hikers who want a dedicated shelter, our Trekker Tent 1A is a one-person tent that uses trekking poles for setup.
5. Insulation and Weather Protection: Extra Clothing and Rain Gear
Weather protection is one part of preparing for a hike. Consider the clothing you carry and the forecast, and plan layers for changing conditions.
The three-layer system, explained
- Base layer (next to skin): Merino wool or a synthetic like polyester moves moisture away from your skin. Cotton is the one fabric to leave home, it holds water and stops insulating when wet.
- Mid-layer (insulation): A fleece, grid fleece, or lightweight synthetic puffy traps warmth. Fleece breathes well during hard climbing; a puffy is warmer at rest and packs smaller. Many hikers carry both on cold trips and shed the puffy while moving.
- Shell (weather protection): A rain shell blocks wind and rain. Look for taped seams and a hood that fits over a hat. Pit zips let you vent steam during climbs without stopping to remove the shell.
Match the kit to the trip
The essentials can vary with the trip:
- Summer day hike: Lightweight rain shell, a thin fleece, a dry synthetic tee in a sealed bag, sun hat, and sunscreen. The shell is for afternoon thunderstorms, not cold.
- Shoulder-season day hike: Add a puffy mid-layer, gloves, and a warm hat. Temperature swings of 20-30°F between trailhead and summit are common, and a hiker who starts in a tee can be shivering at lunch.
- Overnight or multi-day: Add a dedicated dry base layer and socks sealed in a waterproof bag, plus a warmer insulation layer for camp. A dry layer stored in a sealed bag is worth its weight when the temperature drops.
- Exposed ridgelines and alpine terrain: Windproof layers matter as much as waterproof ones. A wind shell over a fleece can be warmer than a bulky puffy in moving air.
Rain gear and sun protection
Consider carrying rain gear, a hat, and sunglasses for exposed ridgelines.
Water Purification Tablet Strips →
Consider packing extra clothing suited to your trip.
6. First Aid and Injury Care: Kit, Guide, and Blister Treatment
A first aid kit for hikers can include bandages, antiseptic wipes, tweezers, blister treatment, adhesive tape, and a compact guide.
Our multi-functional outdoor first aid kit with trauma bag includes a blue tourniquet, bandages, alcohol swabs, tweezers, scissors, and an emergency blanket in a tactical backpack. Pair it with our 52-page Urgent First Aid Guide with CPR and AED for a pocket-sized quick-reference guide. The guide includes official Stop the Bleed information and states that it meets OSHA and the newest ANSI First Aid Guidelines.

Blister treatment can be included in a hiking first aid kit.
7. Water and Hydration: Carrying Capacity and Purification
Plan water capacity for your route and consider carrying a way to treat water from other sources.
Our Water Purification Straw | Personal Emergency Water Filter is designed for drinking from water sources as you sip. For backup, our Water Purification Tablet Strips cost $0.99; each tablet treats one liter of clear water, with a 30-minute wait before drinking. Follow the package instructions.


Follow the package instructions for water treatment.
Here are the water treatment facts the article states for planning your hydration kit.
| Item | Value | Note |
|---|---|---|
| Water Purification Tablet Strips | $0.99 | Backup water treatment option |
| Tablet dose | One tablet per liter | For clear water |
| Wait before drinking | 30 minutes | Follow the package instructions |
| Water Purification Straw | Personal emergency water filter | Designed for drinking as you sip |
8. Extra Food, Nutrition, and Signaling Tools
Consider packing extra food and signaling tools for a hike.
Consider carrying signaling gear such as a whistle. Our 125-Piece Emergency Survival Gear Kit for Outdoor Adventure includes a whistle, compass, flashlight, thermal blanket, raincoat, and a 100-piece first aid set in a pouch measuring 8.66 x 6.3 x 1.97 inches.
Build your kit around navigation, light, fire, shelter, insulation, first aid, water, and food, and check each item before your hike. North American Tactical Supply offers practical, all-in-one solutions for preparedness. Shop now.
Frequently Asked Questions
What are the essential survival items for hikers?
A hiking kit can include navigation tools (map, compass, GPS), a headlamp with spare batteries, fire-starting tools, emergency shelter, insulation and rain gear, a first aid kit, water and purification, extra food, and a knife or multi-tool. Check your items before you leave.
What should be in a hiking survival kit checklist?
A hiking survival kit checklist can include a map and compass, headlamp with spare batteries, fire-starting tools, emergency shelter, extra clothing and rain protection, a first aid kit, water treatment, extra food, and signaling tools. Review your checklist before a hike.
What are the 10 essentials for hiking?
The 10 essentials for hiking are navigation, illumination, fire, shelter, insulation, first aid, water, food, a knife or repair kit, and emergency signaling. The list is a framework, not a fixed packing list. A short day hike may need only a small subset, while a long backcountry trip requires every category plus backups. Use the 10 essentials to check that no category is missing before you head out.
How much water should hikers carry?
Plan water capacity for your route and consider carrying a way to treat water from other sources. North American Tactical Supply offers a Water Purification Straw and Water Purification Tablet Strips.
What survival gear should I carry on a day hike?
A day hike kit can include a first aid kit, headlamp, emergency blanket, water and a purification method, extra food, a whistle, and a map or offline GPS. Consider packing items suited to your hike.
